Showing posts with label Feminine. Show all posts

Friday, January 12, 2024

Perennial Lavender Suite- Thank You

Hello stampers,

Today I made a card using all but 1 item in the Perennial Lavender Suite & what I'm going to call a different version of the cut & flip technique with DSP paper.

I started with 2 pieces of the same piece of the Perennial Lavender DSP, but cut 1 of the pieces opposite of the other one (I cut 1 floral side up & 1 purple side up) so that all pieces would fit together correctly & you could use on 2 cards. I attached the pieces to a layer of Basic White Cardstock without having to guess where they should go. Next, I used the Perennial Postage Dies to die-cut a rectangle out of Basic White Cardstock, stamped the bunch of lavender from the Painted Lavender Stamp Set using Highland Heather Ink, stamping off twice before stamping onto the cardstock, then stamped a sentiment from the Perennial Postage Stamp Set using the same ink without stamping off & popped it up using Stampin' Dimensionals. I then used the Painted Lavender Dies to die-cut the flower with stems using Basic White Cardstock & then colored them in using Highland Heather & Shaded Spruce Stampin' Blends Combo Packs. Lastly, I added a few of the Purple Fine Shimmer Gems to add some bling to the card.


Paper Measurements-

  • Highland Heather Cardstock:
    • Base - 8 1/2 x 5 1/2
  • Basic White Cardstock:
    • Layer - 4 x 5 1/4
    • Layer - 3 x 2 1/4
    • Layer - 1 x 4 1/4
  • Perennial LavendarDSP:
    • Layer - (2) 4 x 5 1/4
~Thanks for stopping by!
All supplies are Stampin' Up! unless otherwise noted.
Product List

Thursday, January 11, 2024

Stippled Rose- Best Birthday Wishes

Hello stampers,

I've been real busy lately & I realized last night that I had this post set for PM instead of AM, so I moved it to today. EEK! I really need to focus on what I'm working on in the moment & try to quiet my brain until I'm done.

I chose to use the Stippled Rose Bundle for today's card. I stamped the big rose cluster using Memento Black Ink on Basic White Cardstock, die-cut it, then colored it in using Bubble Bath & Soft Sea Foam Stampin' Blends Combo Packs. I used the Bubble Bath ribbon in the Sheer Ribbon Combo Pack to the back of the die-cut in a zig-zag motion & then added Stampin' Dimensionals. I took a layer of Soft Sea Foam Cardstock & embossed it using the Paint Texture 3D Embossing Folder, before attaching it to a Bubble Bath Cardstock base. I then placed the die-cut image on top of the card's base, adding a strip of Bubble Bath Cardstock for the sentiment stamping it with Memento Black Ink to finish the card.


Paper Measurements-

  • Bubble Bath Cardstock:
    • Base - 8 1/2 x 5 1/2
  • Soft Sea FoamCardstock:
    • Layer - 4 x 1
  • Basic White Cardstock:
    • Layer - 4 x 1
~Thanks for stopping by!
All supplies are Stampin' Up! unless otherwise noted.
Product List

Thursday, October 5, 2023

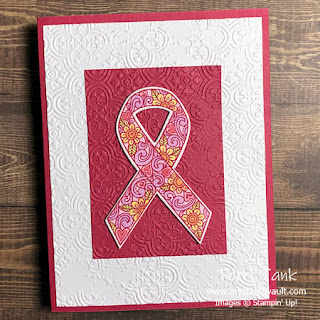
Ribbon Of Courage

Hello stampers,

I'm having a Thursday throw-back moment for today's project. I've been going through my stamp sets determining if I can possibly give some up or not & then organizing/inventorying them. It is breast cancer awareness month, so I thought I'd make a card with the retired Ribbon Of Courage Stamp Set.

I started by stamping the ribbon using Melon Mambo Ink on Basic White Cardstock, then used the Support Ribbon Dies to die-cut it. I colored the ribbon using Bubble Bath, Flirty Flamingo, Daffodil Delight, Pumpkin Pie, Fresh Freesia & Parakeet Party Stampin' Blends Combo Packs. I embossed a small layer of Melon Mambo Cardstock & a layer of Basic White Cardstock with the Distressed Tile 3D Embossing Folder, then attached both to a Melon Mambo Cardstock base. I added the ribbon with Stampin' Dimensionals before adding it to the card.

Paper Measurements-

  • Melon Mambo Cardstock:
    • Base - 8 1/2 x 5 1/2
    • Layer - 2 1/2 x 3 1/2
  • Basic White Cardstock:
    • Layer - 4 x 5 1/2
    • Layer - 2 1/4 x 3 1/4
~Thanks for stopping by!
All supplies are Stampin' Up! unless otherwise noted.
Product List

Thursday, July 6, 2023

Dainty Delight - Celebrate You

Hello stampers,

I hope everyone had a good 4th! It was a pretty lazy day for us, until it was time for the fireworks then we had to try drowning them out a bit with the tv's volume way up, although it didn't work as well this year for a few of the cats. UGH!

I had fun coloring with the Stampin' Blends today. I used the Dainty Delight Stamp Set with Granny Apple Green Ink, coloring with Daffodil Delight, Flirty Flamingo, Highland Heather, Azure Afternoon & Granny Apple Green Stampin' Blends Combo Packs on Basic White Cardstock. I stamped a sentiment from the set using Granny Apple Green Ink, then use the splatter stamp from Layering Leaves Stamp Set to add around the flowers using Daffodil Delight Ink. When I was done I added a layer of Daffodil Delight Cardstock & then to a Granny Apple Green Cardstock base. To finish the card, I added a few Enamel Dot Essentials.

Paper Measurements-

  • Granny Apple GreenCardstock:
    • Base - 8 1/2 x 5 1/2
  • Daffodil Delight Cardstock:
    • Layer - 4 1/8 x 5 3/8
  • Basic White Cardstock:
    • Layer - 4 x 5 1/4
~Thanks for stopping by!
All supplies are Stampin' Up! unless otherwise noted.
Product List