Showing posts with label Holiday Catalog-2018. Show all posts

Friday, October 5, 2018

Still Night Birthday

Hello stampers,
     YAY, I was finally able to get my computer & phone to play nice with each other so I could post the card I made. I've been trying to figure out at least 1 idea for cards from the sets I got through pre-order & now am trying to work through my 2nd order of the Holiday Catalog.
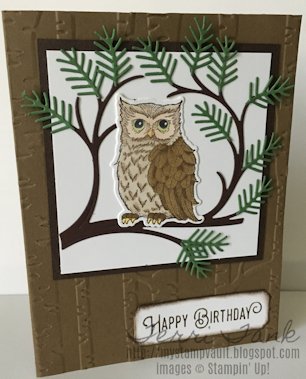
    For this card, I started with a Soft Suede Card Stock base that I embossed using the Big Shot & the Woodland TIEF. Next, I stamped the owl from the Still Night Stamp Set onto Whisper White Card Stock using Early Espresso Ink. To color the owl, I used Light/Dark Crumb Cake, Light/Dark Soft Suede, Light Mango Melody, Light Granny Apply Green, Light Black & Ivory Stampin' Blends, I got the color idea from Chris Slogar's blog but I added the ivory color to the eye area instead. I also used the retired White Signo Gel Pen to put the white dot in the eyes. After I was satisfied with the look I used the Big Shot & the Night Owl Thinlets to die cut the owl, branch, pine boughs & the sentiment box out. I then adhered all but the sentiment box to a Whisper White Card Stock square with Tombo Multi Glue, then adhered it to a square of Early Espresso Card Stock. To finish off the card, I added a sentiment from the Lift You Up Stamp Set using Early Espresso Ink to the sentiment box, then used a dauber to sponge around the sides.
Card Measurements

  • Soft Suede base- 5.5"x8.5"
  • Early Espresso layer- 3.5"x3.5"
  • Whisper White layer- 3.25"x3.25"

  • ~Thanks for stopping by!
    All supplies are Stampin' Up! unless otherwise noted.

    Wednesday, September 19, 2018

    BSU091918

    Hello stampers,
         Welcome back to another week of BSU Challenges. This week we are focusing on the technique of Woodland Faux or another name is Embossing Folder Technique. Now, I must say that I've always thought that this was a very cool way to use embossing folders, however, me doing it is a whole different experience that I wasn't great at. After several redo's I gave up & decided to just show what I had, mistakes & all. I'm not exactly sure what I'm doing wrong but my guess is a softer hand is needed but not too soft because then you don't get the stamped images to come through & I just couldn't get that happy medium.
         For today's card, I started off with a Balmy Blue Card Stock base. This is a 1st for using this color & I really like it, it reminds me of our old Blissful Blue which was great for baby boy cards. Next, I took the Woodland Textured TIEF, prepped it by sponging some Balmy Blue Ink on the side that has "Sizzix" written on it for the sky. Then I took the tree bunch from the Winter Woods Stamp Set using Soft Suede Ink I stamped it twice directly onto the folder. After finishing what I thought looked pretty good, I put a piece of Whisper White Card Stock into the folder then ran it through the Big Shot to create the scene. There are many videos about this technique on YouTube if you want to search for it & try it yourself, I hope you have a bit more success than I did.

    Card Measurements

  • Balmy Blue base- 5.5"x8.5"
  • Soft Suede layer- 3 7/8" x 5 1/8"
  • Whisper White layer- 3.75"x 5"

  •      Don't forget to head on over to Carol's blog HERE and then to Stace's blog HERE. To see what both did for this week's challenge. I'm sure both will be fantastic. Hope you try this challenge out too! We have a new Facebook group if you want to join us and show us what you came up with HERE.

    ~Thanks for stopping by!
    All supplies are Stampin' Up! unless otherwise noted.

    Tuesday, September 18, 2018

    Dashing Deer Wishes

    Hello stampers,
         I'm back with another card from the Holiday Catalog today. I hope y'all have seen it & are able to find some things to make your holiday cards with.
         So today's card is a spin-off to a card I made last week. I started with a Crumb Cake Card Stock base followed by a Crumb  Cake layer that I ran through the Big Shot with the Woodland TIEF to emboss the paper. Next, I took the 2 small deer from the Dashing Deer Stamp Set & stamped them onto Very Vanilla Card Stock using Soft Suede Ink. I followed this with the tree bunch from the Winter Woods Stamp Set that I stamped using Crumb Cake Ink. I used a sentiment from the Dashing Deer Stamp Set & stamped it using Cherry Cobbler Ink. A very simple card to make & probably mass produce.
    Card Measurements

  • Crumb Cake base- 5.5"x8.5"
  • Crumb Cake layer- 3.75"x5"
  • Cherry Cobbler layer- 2.75"x3.5"
  • Very Vanilla layer- 2.5"x3.25"

  •     
    ~Thanks for stopping by!
    All supplies are Stampin' Up! unless otherwise noted.

    Thursday, September 13, 2018

    Making Spirits Bright

    Hello stampers,
         So yesterday I was perusing ideas on Pinterest which I haven't done in a while in hopes of getting an idea or two & saw this really cute card that I just had to CASE. I may even make this one of my Christmas cards this year. I did change mine up just a bit since I didn't have all the products Tina Zink used on her card, but she does have a video of this card in case you want to copy her too. You can find her post HERE.
         For this card, I used 3 new sets that are in the Holiday Catalog. I started with a Crumb Cake Card Stock base, followed by a layer of Crumb Cake where I stamped the Buffalo Check Stamp Set using Shaded Spruce Ink & again making it a plaid (thanks again Teresa M.) with the Light Cherry Cobbler Stampin' Blends. For the stamped piece, I used Whisper White Card Stock where I stamped the snowman couple from the Spirited Snowmen Set, the trees from the Lovely As A Tree Stamp Set & the lights/sentiment from the Making Christmas Bright Stamp Set using Memento Black Ink. I used various inks to color in the snow couple & lights along with a Blender Pen. I added a bit of Wink Of Stella to the snowmen & to the lights, which doesn't pick up in the picture all too well. Before attaching the stamped piece to the card I added a loop of the Burlap Ribbon to the lower left side & then popped it up using Stampin' Dimensionals. The last thing I did once the card was put together was put a dab of our Fine Tip Glue to each of the light bulbs to not only enhance the glimmer but also to make them look like glass.

    Card Measurements
  • Crumb Cake base- 5.5"x 8.5"
  • Crumb Cake layer- 4"x 5.25"
  • Shaded Spruce layer- 3.5"x 4.5"
  • Whisper White layer- 3.25"x 4.25"

  •      
    ~Thanks for stopping by!
    All supplies are Stampin' Up! unless otherwise noted.

    Wednesday, September 12, 2018

    BSU091218

    Hello stampers,
         I know I've been MIA a lot lately, it's hard to be creative when all you can do is stare at your crafting supplies, but I am hoping to do better. This week's BSU challenge is all about the color combo of Blackberry Bliss, Tranquil Tide & Gray Granite. When I sat down to work on this challenge I had no idea what I could possibly do with these colors, but I remember seeing Teresa Mitchell posting on one of my FB groups these cool looking plaid backgrounds that embellished the new Buffalo Check Background Stamp.
         I started the card off with a Blackberry Bliss Card Stock base, followed by a layer of Gray Granite Card Stock that I had stamped with the Buffalo Check Stamp Set using Tranquil Tide Ink, then went in with a Blackberry Bliss Stampin' Blend to make a plaid background. Next, I ran scraps of Blackberry Bliss & Tranquil Tide Card Stock through the Big Shot to die cut the detailed big leaf using the Detailed Leaves Thinlets. I also ran a scrap of Gray Granite Card Stock through the Big Shot using the Stitched Shapes Framelits to die cut the largest oval that comes with it & added the sentiment from the Falling For Leaves Stamp Set using Tranquil Tide Ink.
    Card Measurements


  • Blackberry Bliss base- 5.5"x8.5"
  • Gray Granite layer- 4"x 5.25"

  •      Don't forget to head on over to Carol's blog HERE and then to Stace's blog HERE. To see what both did for this week's challenge. I'm sure both will be fantastic. Hope you try this challenge out too! We have a new Facebook group if you want to join us and show us what you came up with HERE.

    ~Thanks for stopping by!
    All supplies are Stampin' Up! unless otherwise noted.

    Wednesday, September 5, 2018

    BSU090518

    Hello stampers,
         Sorry, I've been missing in action lately, last week was busy & very noisy with putting on a new roof/gutters installed & getting new kitten fosters in that mix made me just sit at my desk & stare at all of my supplies. For this week's BSU challenge we chose the Holiday Catalog as the theme & just in time as the catalog went LIVE today. WOOHOO! There are lots of little goodies in there & I'll be getting more soon.
         For today's card, I chose to feature the Beautiful Baubles Stamp Set. I started with a Pool Party Card Stock base, followed by a layer of Night Of Navy Card Stock. For the stamped piece, I used Whisper White Card Stock. I started stamping with the Christmas Pines Stamp Set, stamping the needles with Old Olive Ink, the base stamp was stamped off once then the 2nd stamp was full on. Next, I stamped the solo ornament, string & sentiment from the Beautiful Baubles Stamp Set using Night of Navy Ink. I then colored in the ornament using the Light & Dark Pool Party Stampin Blends. To finish it off, I used Wink Of Stella on the ornament to give it a bit of sparkle.


    Card Measurements


  • Pool Party base- 5.5"x8.5"
  • Night Of Navy layer- 4"x5.25"
  • Whisper White- 3.75"x5"

  •      Don't forget to head on over to Carol's blog HERE and then to Stace's blog HERE. To see what both did for this week's challenge. I'm sure both will be fantastic. Hope you try this challenge out too! We have a new Facebook group if you want to join us and show us what you came up with HERE.

    ~Thanks for stopping by!
    All supplies are Stampin' Up! unless otherwise noted.

    Wednesday, August 22, 2018

    BSU082218

    Hello stampers,
         So for this week's BSU challenge, Carol made a sketch for us to try. So once again I'm showcasing some sneak peek's at the Holiday Catalog, the stamp set you've seen previously but not the TIEF.
         I started with a Balmy Blue Card Stock base, followed by a layer of Night Of Navy Card Stock that had been run through the Big Shot with the Swirls & Curls TIEF. Next, I used the Spirited Snowmen Stamp Set to stamp the snowflakes with Balmy Blue Ink onto the Whisper White Card Stock Banner that was made using the Triple Banner Punch. Another banner was made using Balmy Blue Card Stock. Next, I used Whisper White Card Stock to cut out a circle using the Stitched Shapes Framelits & Night Of Navy Card Stock with the Layering Circles Framelits to cut out the circles. I stamped one of the snowmen from the set with Memento Black Ink & before attaching it to the card I used some Silver Thread to it for the detail.
    Card Measurements
    • Balmy Blue base- 5.5"x8.5"
    • Night Of Navy layer- 4"x5.5"
    • Whisper White banner- 1.5"x4"
    • Balmy Blue banner-1"x4"
         Don't forget to head on over to Carol's blog HERE and then to Stace's blog HERE. To see what both did for this week's challenge. I'm sure both will be fantastic. Hope you try this challenge out too! We have a new Facebook group if you want to join us and show us what you came up with HERE.

    ~Thanks for stopping by!
    All supplies are Stampin' Up! unless otherwise noted.

    Friday, August 10, 2018

    Holiday Catalog Sneak Peek

    Hello stampers,
         Happy Friday y'all! Today I'm giving you a sneak peek of another set in the Holiday Catalog. I just love snowmen!
         I started off with a base of Old Olive Card Stock, followed by a layer of retired Quilted Christmas DSP. For the stamped piece, I used Whisper White Card Stock & stamped the snowman pair from the Spirited Snowman Stamp Set using Memento Black Ink. I colored them in with Basic Black Stampin' Marker, along with Dark Real Red & Dark Old Olive Stampin' Blends. I took the Light Pool Party Stampin' Blends & went around them as I have seen many people do I assume for shading but I thought I'd give it a try. Lastly, I stamped a sentiment from the set using Real Red Ink for the "love" & Memento Black Ink for the "never melts" part.
    Card Measurements


  • Old Olive base- 5.5" x 8.5", layer 3.25" x 4.25"
  • Quilted Christmas DSP- 4" x 5.25"
  • Whisper White- 3" x 4"

  •     
    ~Thanks for stopping by!
    All supplies are Stampin' Up! unless otherwise noted.

    Tuesday, August 7, 2018

    Holiday Catalog Sneak Peek

    Hello stampers,
         It's beginning to look a lot like Christmas...oops sorry didn't know anyone could hear my off-key singing. As you may have seen lately the Holiday Catalog has been unveiled to demonstrators & I've been singing to myself while putting my stamps together from the pre-order. Has anyone begun making their Christmas cards yet? I had an idea as I was putting my stamps together & wanted to try it out before I forgot it. What do you think?
         For this card, I started with a Granny Apple Green Card Stock base, followed by a layer of retired Quilted Christmas DSP, since I didn't order any from the holiday catalog like I thought I had. For the stamped piece, I used Whisper White Card Stock, stamped it first with the starry stamp in the Bokeh Dots Stamp Set using Granny Apply Green Ink then going over it with the ornaments from the Beautiful Baubles Stamp Set using Real Red Ink. The sentiment is also from the Beautiful Baubles Stamp Set & was stamped using Real Red Ink as well. I think this would be a simple card to duplicate, but I've got a few other colors I'd like to try as well.

    Card Measurements
    • Granny Apply base- 4.25" x 11"
    • DSP- 4" x 5.25"
    • Whisper White- 3.5" x 4.75"
    ~Thanks for stopping by!
    All supplies are Stampin' Up! unless otherwise noted.