Showing posts with label Punch Ideas. Show all posts

Tuesday, September 1, 2026

Simply Leaves - Thanks

Hello Stampers,
Happy September y'all I hope all is well! Today marks the 1st day of the new catalog, along with new kits, POTM & Online Exclusives. This week I will be showcasing the Simply Leaves Bundle.

Today's card was inspired by a past sketch from Freshly Made Sketches. I started this card with a Very Vanilla Cardstock base & layer that was embossed using the Forever Plaid 3D Embossing Folder. I then used the Stylish Shapes Dies to die-cut a square from Pecan Pie Cardstock. I used the Simple Leaf Punch to punch out 2 leaves using the 2026-28 In Color Gingham Gallery DSP, which I adhered to the square "diamond." Next, I used a sentiment from the Simply Leaves Stamp Set stamping with Pecan Pie Ink onto Very Vanilla Cardstock, then used the 3 Banner Punch to punch it out & ran one end through again to make a smaller banner for the sentiment & used Stampin' Dimensionals to pop it up. Lastly, I added a Linen Thread bow to finish the card.


~Thanks for stopping by!
All supplies are Stampin' Up! unless otherwise noted.

Product List

Friday, October 20, 2023

Inked & Tiled- Hello

Hello stampers,

YAY, it's Friday! What are your plans for the weekend? I don't think we have anything planned unless hubby forgot to put something on the calendar. Maybe I'll see about catching up on some of the videos I missed from Creativate last weekend.

Today I'm playing with a different punch which actually comes as a set, Inked & Tiled Punch Set. I matched it with the Inked Botanical DSP to make a pattern on Basic White Cardstock. This was then layered on Lost Lagoon Cardstock. For the base, I used Crushed Curry Cardstock, then used a sentiment stamp from the Biggest Wish, along with the flower from Inked & Tiled Stamp Sets & paired them with Crushed Curry Ink to stamp at the bottom of the card. I added Iridescent Rhinestones to each X & a few down by the sentiment to finish the card.


Paper Measurements-

  • Crushed Curry Cardstock:
    • Base - 8 1/2 x 5 1/2
  • Basic White Cardstock:
    • Layer - 3 3/4 x 3 3/4
  • Lost Lagoon Cardstock:
    • Layer - 3 7/8 x 3 7/8
  • Inked Botanicals DSP:
    • Layer - 1 1/4 x 2 1/2 
~Thanks for stopping by!
All supplies are Stampin' Up! unless otherwise noted.
Product List

Wednesday, March 3, 2021

Sweet Ice Cream Fun #2

Hello stampers,
     Here are the last 3 cards made from the Sweet Ice Cream Stamp Set. I did some creative licensing by changing a few things but overall the same look. These cards are using Cinnamon Cider, Bumblebee, Bermuda Bay, Kraft, Whisper White & Basic Black Cardstock.  The inks were Blackberry Bliss, Bermuda Bay, Terracotta Tile, Cinnamon Cider, Early Espresso & Memento Black.
     
     This card was supposed to be fussy cut, but instead I stamped directly onto the cardstock.

     For the last 2 cards, I changed the sentiments as I tend to use more birthday cards than anything else.

~Thanks for stopping by!
All supplies are Stampin' Up! unless otherwise noted.

Monday, March 1, 2021

Sweet Ice Cream Fun #1

Hello stampers,
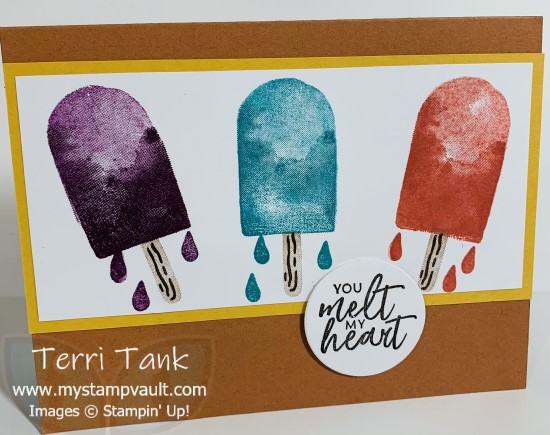
     Sharing another sample set from the virtual stamp day on Saturday. The Sweet Ice Cream Stamp Set is a newer set for me but is still one that I haven't put any ink to until Saturday. The one thing that didn't dawn on me until that day is that the popsicle has to be fussy cut as it isn't covered by the punch that goes with the set, at least it wasn't hard to cut like some others.
     For these cards we used Bumblebee, Early Espresso, Cinnamon Cider, Bermuda Bay, Terracotta Tile & Blackberry Bliss Inks. Cardstock colors were Kraft, Early Espresso, Bermuda Bay, Bumblebee, Blackberry Bliss & Whisper White.     
For the sentiment on this card I split the Happy Birthday so that it was stacked instead of a line. Be careful to make sure you don't get any part of the B with the happy, I just cleaned the B to make sure there was no ink on it.

     These popsicles remind me of the multi-colored ones we had as kids. These were fun cards to make but took some time having to punch out so much stuff. 

~Thanks for stopping by!
All supplies are Stampin' Up! unless otherwise noted.

Wednesday, February 24, 2021

Pretty Perennials #2

Hello stampers,
     I hope today is another day that will inspire you to create. I really needed that virtual stamp day to put me in the stamping mood. 
     For today's cards, we used the Pretty Perennials Stamp Set & Happy Thoughts Stamp Set from my virtual stamp day. They use Memento Black, Magenta Madness, Bumblebee, Cinnamon Cider, Misty Moonlight & Just Jade in both ink & Cardstock. 


     I'll be sharing another set of cards we made using the Sweet Ice Cream Stamp Set next week.  

~Thanks for stopping by!
All supplies are Stampin' Up! unless otherwise noted.

Monday, July 30, 2018

Dandelion Wishes

Hello stampers,
     Today's card I made for a recent swap I hosted & I hope by now everyone has gotten so that I can share it. Dandelion Wishes was a set that really intrigued me when I saw it in the catalog but I wanted to see what other people did with it before I bought it. I started this card with totally different colors in mind but I just couldn't wrap my mind around them, until I put these 2 together- Night Of Navy & Lemon Lime Twist.
     I started with the base of the card using Lemon Lime Twist Card Stock followed by a layer of Night Of Navy Card Stock. I stamped on a 3x3" Whisper White Card Stock the dandelion trio from the Dandelion Wishes Stamp Set in Night Of Navy Ink, which I then layered with a 3.5x3.5" layer of Lemon Lime Twist Card Stock. Next, I took a strip of Whisper White Card Stock that punched with the Tailored Tag Punch to add a sentiment from the same set in Night Of Navy Ink, then sponged Lemon Lime Twist Ink around the tag. Before assembling the Night Of Navy layer to the card I added the Lemon Lime Twist Ombre Ribbon with the tag attached to get a perfect placement. To finish off the card I used Basic Jewels in the center of each dandelion.

~Thanks for stopping by!
All supplies are Stampin' Up! unless otherwise noted.

All The Good Things

Hello stampers,
     I finally made a card without too much trouble! I saw a challenge this weekend from The Paper Players & decided to work with it to make a card.
     I started with a base of Whisper White Card Stock. Next, I used Mango Melody Card Stock as a layer that I had stamped with the koi fish from the All The Good Things Stamp Set using Mango Melody Ink. I layered this with a strip of Smoky Slate Card Stock & Whisper White Card Stock that I had stamped the little origami star from the Artfully Folded Stamp Set with Smoky Slate & Melon Melody Ink. For the label, I took a 2" strip of Whisper White Card Stock & punched one end with the Scallop Tag Punch & sponged Mango Melody Ink around the label. I then took the big koi stamp that has the word attached to it & used my Smoky Slate Marvelous Marker to color just the words, then stamped the smaller koi twice with Mango Melody Ink. I finished the card with a Whisper White Twine bow attached to the card using a Glue Dot.
   
     
~Thanks for stopping by!
All supplies are Stampin' Up! unless otherwise noted.

Wednesday, December 20, 2017

Wreath Punch Art

Hello stampers,
     Today's card has a bit of punch art to make the card that was made at Kerri's last class.
     To start the card we used Crumb Cake Card Stock, followed by a layer of Whisper White Card Stock.  We used a smaller layer of Cherry Cobbler Card Stock that we embossed using the Snowflake Sentiments Stamp Set for the sentiment, White Embossing Powder & the Heat Tool. For the wreath, we used the Leaf Punch along with Garden Green Card Stock to punch out about 8 leaf stems (cutting off the stem off the end.) Instead, of using a ribbon bow, I changed it to a paper bow using the Pretty Pines Thinlets & Big Shot.
~Thanks for stopping by!
All supplies are Stampin' Up! unless otherwise noted.

Tuesday, November 7, 2017

Wreath Punch Thanks

Hello stampers,
     Today's card comes from Kerri's last class. I never thought to use this punch to make a wreath with, guess I need to work on making mine a bit more circular.
     We started with a Cherry Cobbler Card Stock base, followed by a layer of Smoky Slate Card Stock that we stamped with the Hardwood Stamp Set using Smoky Slate Ink stamped off once. Next, we took a sentiment from the retired Thoughtful Branches Stamp Set using Cherry Cobbler Ink. Kerri was nice enough to punch out many leaves from the Leaf Punch using Cherry Cobbler, Pumpkin Pie, Daffodil Delight & Old Olive Card Stock, which we then put on the card in a circular fashion & topped it with a Linen Thread bow.
~Thanks for stopping by!
All supplies are Stampin' Up! unless otherwise noted.

Friday, July 21, 2017

Daisy Thanks

Hello stampers,
     So today's card is one that I did at Linda Bauwin's stamp day when she came here last month. I really like this card, the set & Luscious Lime is becoming a favorite color of mine.
     We started off with a Whisper White Card Stock base, followed by a layer of Basic Black Card Stock, an even smaller layer of Whisper White Card Stock & a layer of Fresh Florals DSPLuscious Lime 1/2" Finely Woven Ribbon was added around the smaller layers before adding 2 punched flower parts using the Daisy Punch & then adding a Luscious Lime Card Stock dot punched out with the 1/2" Circle Punch. I'm not sure which set the sentiment came from but it was stamped using Memento Black Ink & then fussy cut out to make it look like a banner.

    ~Thanks for stopping by!
All supplies are Stampin' Up! unless otherwise noted.

Thursday, July 20, 2017

Jar of Love Birthday

Hello stampers,
     Oh my, it's been awhile since I posted & I have all of these cards just waiting to be shown, just not the time to finish a post. UGH!
     So I made this card at one of Kerri's classes a while back. Not sure how I missed posting this but I did. The card starts off with a Peakaboo Peach Card Stock base, followed by a layer of Basic Black Card Stock. On Whisper White Card Stock, we stamped the jar from the Jar of Love Stamp Set in Memento Black Ink along with the sentiment (which I'm not exactly sure which set it comes from). Next, we took a piece of retired Mint Macaron Card Stock punched it with the retired Scallop Edge Punch & then fussy cut a "v" into each scallop to make the grass. Lastly, the retired Spring Bouquet Punch was used to make flowers beforehand for us in Peekaboo Peach, Flirty Flamingo, Sweet Sugarplum & So Saffron Card Stock, which we then added a Basic Pearl to each flower.


~Thanks for stopping by!
All supplies are Stampin' Up! unless otherwise noted.

Monday, March 13, 2017

Butterfly Thanks

Hello stampers,
     So last week Mother Nature hit us with hurricane type wind gusts & now she decided we needed a nor'easter to bring us snow since she hadn't given us much this season. Of which I am not complaining about, but a possible foot or more in 48 hours is just a bit much for this CA girl. I'm really hoping the weather guys have it wrong & we only get a few inches, but I have no intention of leaving the house until Wednesday at the earliest. And I really feel sorry for those up in the northeast cuz it looks like it will hit them a bit harder.
     For today's card, we made a card that uses a favorite color combo from my childhood it's just missing a good burgundy color to go with it. Whisper White Card Stock was used as the base of the card, where we used 2 stamps from the Gorgeous Grunge Stamp Set, the thicker splotches were stamped using Smoky Slate Ink, the smaller splotches & the sentiment from the Flourishing Phrases Stamp Set were stamped with Basic Gray Ink. We then used scraps of Basic Gray & Blushing Bride Card Stock to punch out flowers using the Petite Petals Punch. Blushing Bride Card Stock was then used to die cut the butterfly using Butterfly Thinlets & the Big Shot. Before attaching the butterfly to the card Silver Metallic Thread was put on the card using Mini Glue Dots then using those same dots to attach the butterfly. To finish off the card we placed Basic Rhinestones on the flowers & butterfly.
~Thanks for stopping by!
All supplies are Stampin' Up! unless otherwise noted.

Monday, August 29, 2016

Thank You

Hello stampers,
     Today's card is a fast, easy & quick card to make, we happened to do it in one of Kerri's classes. We used the One Big Meaning Stamp Set and stamped that first on the bottom of the card using Memento Black Ink. Next, we took some retired DSP and used the 1" circle punch for a total of 8 circles, then we used the retired Small Heart Punch in place of the 9th circle.
     Like I said it is a very easy card to make, especially if you are making multiple cards as a thank you. Great thing about is you can replace it with any type of punches & design your own sketch.
     
~Thanks for stopping by!
All supplies are Stampin' Up! unless otherwise noted.


Monday, April 25, 2016

Hello, Punch Art

Hello stampers,
     Today's card shows off some punch art & imagination (or lack thereof). I recently did this card at one of Kerri's classes, I think I should have taken a picture or what the card should have looked like, but all you get is my very rough interpretation of it.
     We started the card with a Whisper White Card Stock base followed by a layer of Crumb Cake Card Stock. Next, we used the retired Heart To Heart Punch with Red Rose Card Stock to make what was supposed to be a flower design & this is what I came up with. I think I should have left it at just the flower, haha, instead I tried to make a butterfly in the upper right corner & the bottom left was supposed to be the leaves falling away. We added Rhinestone Jewels to various places & then stamped the greeting from A Dozen Thoughts Stamp Set using Craft White Ink. A simple card that didn't turn out so simple!


~Thanks for stopping by!
All supplies are Stampin' Up! unless otherwise noted.

Sets: A Dozen Thoughts
Ink/Markers: Craft White
Paper: Whisper White, Craft, Rose Red
Other: Rhinestone Jewels, Heart To Heart Punch (retired)
Technique: Punch Art

Tuesday, March 15, 2016

BSU031616

Hello stampers,
     I hope your week is going well. I've been busy, busy with rescue stuff & sick kitties. Poor babies, but their foster parents will give them plenty of TLC to get them back on the road to a healthy life.
     This week's BSU challenge is all about the color combo, Carol wanted spring colors & My Create Ink gave us this- Calypso Coral, Wisteria Wonder, Pumpkin Pie, Pool Party & White. WOW, what a color combo! Pumpkin Pie really through me off with the other colors by I found a way to work around it, I also cheated & added in Soft Suede to the mix, but you'll understand why when you see the card.
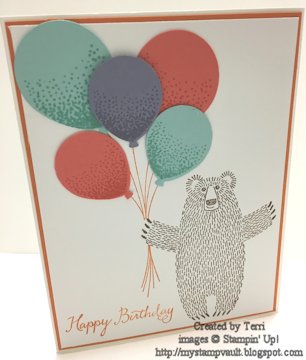
     For this card, I used Whisper White Card Stock for both the base & the stamped layer. Pumpkin Pie Card Stock was used for the second layer. For the stamped piece, I used Soft Suede Ink for the bear from the Bear Hugs Stamp Set, then masked him to be able to stamp the balloon strings in Pumpkin Pie Ink from the Balloon Celebration Stamp Set. Next, I used the Balloon Bouquet Punch to punch out some balloons using Pool Party, Calypso Coral & Wisteria Wonder Card Stock then using the corresponding inks to put the confetti on the balloons. All were attached using Tombo Multi Glue except the Wisteria Wonder balloon which was popped up using a Stampin' Dimensional. Lastly, I used a sentiment from the Balloon Celebration Set in Pumpkin Pie Ink.
     Don't forget to head on over to Carol's blog HERE and then to Stace's blog HERE. To see what both did for this week's challenge. I'm sure both will be fantastic. Hope you try this challenge out too! We have a new Facebook group if you want to join us and show us what you came up with HERE.

~Thanks for stopping by!
All supplies are Stampin' Up! unless otherwise noted.

Sets: Balloon Celebration, Bear Hugs
Ink/Markers: Calypso Coral, Wisteria Wonder, Pool Party, Pumpkin Pie, Soft Suede
Paper: Calypso Coral, Wisteria Wonder, Pool Party, Pumpkin Pie, Whisper White
Other: Balloon Bouquet Punch, Stampin' Dimensionals
Technique: Masking

Tuesday, January 26, 2016

BSU012716

Hello stampers,
     WOW, it has been a busy start to the year! Sorry for the lack of posts, I'm not getting a lot of stamping done these days & then my mom came out for a visit, then got snowed in due to Snowmagedon 2016 hitting Baltimore. Hope everyone fared well, it stayed south & east of us which was good after the 3 days of accumulating snow we had before that.
     So I missed last week's color challenge but am still hoping to make it up. This week it is all about the Botanicals For You Stamp Set in the Sale-A-Bration catalog. Besides me having to pick items out of the catalog I'm not exactly sure why I got this set, maybe I thought it would be easy to use but my mind pretty much went blank last night while working on some ideas. I ended up doing a birthday themed card. To start the card I used Basic Black Card Stock for the base of the card, followed by It's My Party DSP. Next I took a 2 1/4" piece of Whisper White Card Stock, fussy cut the banner end & stamped the sentiment from the Botanicals For You Stamp Set in Memento Black Ink. To finish I stamped the cupcake from Party Wishes Stamp Set in Mint Macaron, Crushed Curry & Melon Mambo Ink, punched them out using the Party Punch Pak then popped them up using Stampin' Dimensionals.
     Don't forget to head on over to Carol's blog HERE and then to Stace's blog HERE. To see what both did for this week's challenge. I'm sure both will be fantastic. Hope you try this challenge out too! We have a new Facebook group if you want to join us and show us what you came up with HERE.

~Thanks for stopping by!
All supplies are Stampin' Up! unless otherwise noted.

Sets: Botanicals For You, Party Wishes
Ink/Markers: Memento Black, Mint Macaron, Crushed Curry, Melon Mambo
Paper:  Whisper White, Basic Black, It's My Party DSP
Other: Party Punch Pack, Stampin' Dimensionals


Tuesday, January 12, 2016

BSU011316

Hello stampers,
     Happy Wednesday y'all! Today's BSU challenge is all about Punch Art which we are considering a technique. It's been awhile since I've made anything with my punches, I forgot how I used to enjoy making things. I'll have to get back to doing it more.
     I decided that I wanted to make a card using a snowman. Why? Because it started snowing here last night & I had to drive in it, YUCK! Luckily it wasn't too bad & it was only around the corner, but I'm not a snow driving type of girl, I'm from Southern Cali for pete's sake! For the base, I used Whisper White Card Stock, followed by a layer of Basic Black Card Stock. Next, I used Soft Sky Card Stock as the foundation for my punch art that I stamped with snowflakes from the Sheltering Tree Stamp Set in White Craft Ink, then I fussy cut some hills into Whisper White Card Stock to make drifts (hopefully none of this will be seen in the morning!) & added one of the sentiments from the same set. Finally, I began putting my snowman together using 1 3/8" & 1 3/4" Circle Punches (head & body), Modern Label Punch (scarf, retired), Large Oval Punch (brim of hat), Itty Bitty Accents Punch Pack (nose), Decorative Label Punch (top of the hat cutting some of it off to look more squarish). I then adhered it so the bottom of the snowman was just under the drift. I think this would make a cute Love or Anniversary card & may very well use it for mine at the end of the month.
     Don't forget to head on over to Carol's blog HERE and then to Stace's blog HERE. To see what both did for this week's challenge. I'm sure both will be fantastic. Hope you try this challenge out too! We have a new Facebook group if you want to join us and show us what you came up with HERE.

~Thanks for stopping by!
All supplies are Stampin' Up! unless otherwise noted.

Sets: Sheltering Tree
Ink/Markers:Memento Black, Basic Black
Paper: Whisper White, Soft Sky, Basic Black, Merry Moments DSP (retired)
Other: 1 3/8" & 1 3/4" Circle Punches, Modern Label Punch (retired), Large Oval Punch, Itty Bitty Accents Punch Pack, Decorative Label Punch
Technique: Punch Art

Wednesday, October 14, 2015

Pumpkin Flourishes

Hello stampers,
     Happy Thursday y'all! Today's card is the last one from Kerri's class last month.
     For this card we started with an Early Espresso Card Stock base, followed by a Crumb Cake Card Stock layer that was stamped with Early Espresso Ink & the Hardwood Background Stamp. For the pumpkin, we used Pumpkin Pie Card Stock that was cut out using the Big Shot & Oval Framelits, which were sponged with Tangerine Tango Ink, then stamped with Flowering Flourishes in Old Olive Ink. For the stem of the pumpkin we used Old Olive Card Stock that we fussy cut then sponged with Always Artichoke Ink, I believe. For the sentiment, we used the Modern Label Punch with Very Vanilla Card Stock, sentiment from Good Greetings (retired) in Crumb Cake Ink applied 2 Rhinestone Jewels on either end of the label then popped it up using Stampin' Dimensionals.


~Thanks for stopping by!
All supplies are Stampin' Up! unless otherwise noted.

Sets: Flowering Flourishes, Hardwood, Good Greetings
Ink/Markers: Old Olive, Early Espresso, Crumb Cake, Tangerine Tango, Always Artichoke
Paper: Early Espresso, Crumb Cake, Very Vanilla, Pumpkin Pie, Old Olive
Other: Rhinestone Jewels, Oval Framelits, Modern Label Punch, Stampin' Dimensionals
Technique: Punch Art, Die Cutting

Friday, August 28, 2015

SFF082815

Hello stampers,
     Happy Frenzy Friday! Hope your week has gone well & you're ready for the weekend. It has been wonderfully cool the past 3 days I've enjoyed immensely opening up my windows & letting the fresh air in. But next week the AC may be coming back on depending on the humidity.
     Today's card uses colors from the new DSP from the holiday catalog called Merry Moments. Yes, it's another Christmas card at some point I'll have to start figuring out what I'll be doing for those & get them done early this year (fingers crossed.) For the base  I used Crumb Cake Card Stock, followed by the Merry Moments DSP. For the stamped images I used 2 stamps in the Lots of Joy Stamp Set & stamped them using Real Red, Cherry Cobbler, Old Olive & Mossy Meadow Inks with a layer of Crumb Cake Card Stock behind each square.
     This week's sketch was created by Jennifer Kay. Hop on over to the SFF blog & check out what the other team members did. Better yet, make your own card based on the sketch below & add your link to this week's challenge. Happy sketching & enjoy your weekend!

~Enjoy
All supplies are Stampin' Up! unless otherwise noted.

Sets: Lots Of Joy
Ink/Markers: Real Red, Cherry Cobbler, Old Olive, Mossy Meadow
Paper: Whisper White, Crumb Cake, Merry Moments DSP

Monday, June 29, 2015

I Think You're Great

Hello stampers,
     WOW, it is the last Monday of the month! Time just keeps going by faster & faster. Today's card is a card we did at Kerri & Mary's Stamp-A-Stack.
     We start off with the base of the card using Basic Black Card stock followed by 2 strips of Tangerine Tango Card Stock. We used the I Think You're Great Stamp Set in Tangerine Tango Ink stamped on Whisper White Card Stock, followed by a layer of Tempting Turquoise Card Stock. Next, we took another stamp from the above set, stamped it using VersaMark, Heat & Stick Powder & Iridescent Ice Embossing Powder, then punched out pieces using the Elegant Butterfly Punch. We then punched out the branch from the Bird Builder Punch using Shimmer White Card Stock. Finally, we used Good Greetings for the sentiment in Wild Wasabi Ink on Whisper White Card Stock, punched it out using the Word Window Punch followed by a layer of Tempting Turquoise Card Stock punched out with the Modern Label Punch, then added the Rhinestone Jewels to either edge.

~Enjoy
All supplies are Stampin' Up! unless otherwise noted.

Sets: I Think You're Great, Good Greetings (retired)
Ink/Markers: Tangerine Tango, Wild Wasabi, VersaMark
Paper: Whisper White, Tempting Turquoise, Tangerine Tango, Basic Black, Shimmer White
Other: Elegant Butterfly Punch, Bird Builder Punch, Word Window Punch, Modern Label Punch (retired), Rhinestone Jewels, Heat & Stick Powder, Iridescent Ice Embossing Powder